

How To Get Crisp Clean Corners By Ceiling When Painting
Cutting in Paint: Top Tips From the Pros
Cut in paint is a skill that will saves you lot time and meliorate the cease of any painting job. We explain the best techniques for getting a well-baked clean line between the walls you are painting and the ceiling or skirting boards that you aren't. We also comprehend a few tips and tricks to make sure that y'all get the best possible cease with the to the lowest degree time and effort. With a little exercise you will be cutting in like a pro!
"Cutting in pigment" is the technique of painting a crisp direct boarder of paint betwixt two joining surfaces e.one thousand. a wall and a ceiling or around objects such every bit windows and door frames.
This has ii advantages in that you get a prissy crisp and neat joint between your walls and ceilings or around your windows and doors and it also allows y'all to quickly embrace the larger wall area using a more suitable tool such as a roller. Evidently information technology is called "Trimming In" in North America, but the techniques are exactly the same.
There are a number of reasons that you would cut in before painting:
- When painting a wall you are going to be using a roller, more probably or mayhap a paint pad. If this is the instance it is impossible to paint into the corners and the joint between the wall and ceiling for example
- It is much quicker that masking upwardly the skirting boards and ceiling to ensure that no paint get on them. It is the only practical way to brand sure that the paint stays only on the wall you are painting if you have a lot to paint
- You lot will get a really crisp, clean line where the paint from the wall ends – if done right!
Cut in is a technique that will relieve time and make the chore look much meliorate
When to Cutting in Paint on a Project
You should cut in just before you paint. Ideally if there are two of you lot painting, the 2nd person should follow you so that you've cutting-in blends into the paint for the whole wall, which is much easier to achieve when the paint is non dry.
Since cutting in paint takes place just earlier yous do the actual painting, information technology is important that you have prepared the walls set up for painting. For more than detailed information about what you should accept done have a look at our project explaining what is needed to prepare a wall or ceiling for painting.
As a a quick reminder, here are some of the more important tasks that you lot probably need to go washed before cutting it:
- Motion all the furniture and pictures that might go far the manner
- Laydown all the necessary dust sheets that you need
- Clean, fill and sand the walls then that they are smooth and fix
- Yous might need to consider a mist coat (a watered downward emulsion)
- Mask up any characteristic that you cannot beget to get pigment on
- Remove annihilation from the wall that you can, including radiators, light fittings and switches
- Become a practiced cutting in brush – information technology doesn't pay to go cheap here
You should always cut in pigment before you paint the residuum of the wall, because if you do it the other way effectually you are more than likely to go a boarder effect around the edges of the walls where y'all have cut in. The roller will get out a slightly stippled event, which a brush volition not.
By painting on peak of the cutting in y'all can fade into the cut in paint. Some professionals advocate using a modest roller as part of your cutting in process to take the roller effect as close to the corner as yous can reasonably achieve – (See more below).
The next stride is to confirm where you lot need to cut in.
Where to Cut in Paint
You volition demand to cut in all around the wall (or walls) that you are painting – every edge. You will also need to cut in along the corners where one wall meets another, even if you are going to paint both walls. This is because the roller volition not get in there and give a consummate roofing of paint.
It is of import to cut in to every border because this will give y'all a crisp and sharp line, which a roller volition not exist able to reach. This is the instance even if yous have masked upwards the skirting boards and the switches.
Cutting in along every edge of the wall beingness painted
Tools Needed for Cutting in Paint
The secret is to have a good quality cutting in brush. Many professionals adopt an angled sash brush as this allows them to get right into the corner, but it is actually upwards to personal preference. Nosotros would suggest a decorators castor, ideally with synthetic beard.
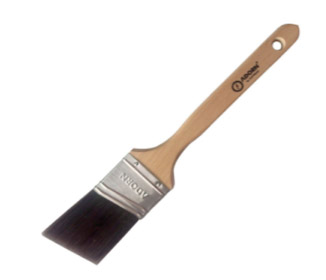
Many decorators adopt to cut in with a sash brush – get one on Amazon hither
As with all things DIY and construction there is a tool for every task and this is no different. Paint edging tools or paint cutting in tools (painters George as they are also known) are readily available from pretty much all DIY stores. Due to their fine indicate you can push it right into any joints and paint along the border leaving you with a crisp and clean bring together.
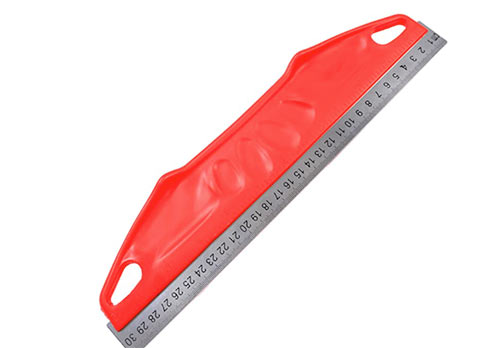
Paint edging tool or paint cutting in tool for cutting in pigment
The only other chip of kit you lot might need (other than the pigment!) is a pocket-sized roller; a 4 inch roller should exist about correct.
The nap (woolliness of the roller) should be the same or similar to the larger roller that you are going to be painting the rest of the room with. This is so that you lot can "terminate" the cut in area with it and age a very similar stippled effect equally the larger roller will leave. This will ensure that the cutting in surface area is not visible.
How to Cutting in Paint
The concept is very easy, just in practice is it much harder and information technology take a great deal of concentration to cutting in paint neatly and get a clean finish, however with a little time this is more than than achievable.
Mix, stir or shake your pigment so that it is ready to be used. Side by side, you volition need to load your brush; this is why yous need a good quality castor and then that you do not over load information technology and it volition hold information technology's shape.
It is a good idea to beginning in a corner or somewhere is doesn't matter too much if you lot don't get a perfect line. You demand to work the castor up and downward the corner to work the paint into the centre of the brush so that when you come to paint your straight line betwixt the edge of the wall and the ceiling, the brush has paint to release.
You only need to use the lesser third of the brush. Try not to get paint all over information technology and do not over load it.
You should concord the brush in a similar fashion a table tennis player holds his bat. Utilize your index finger against the thin side of the beard to give you even more control – this is all about precision. Make sure yous're confortable equally you lot shouldn't be straining to pigsty the brush.
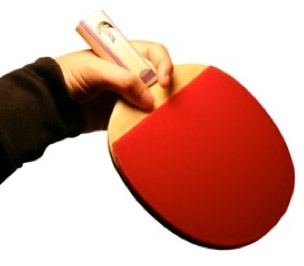
Hold your castor like a table tennis role player
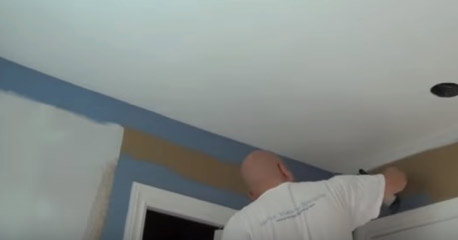
When your brush is loaded then you demand to apply it to the wall. Showtime a couple of cm (approximately an inch) from the corner you are cutting into and gradually, smoothly and confidently describe the brush along the line of the corner, moving towards it until yous are painting a crisp line forth it.
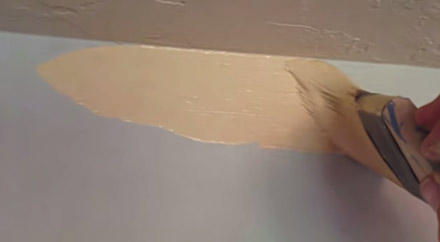
Cutting in up to a ceiling
You will demand to come back the other way, and then don't get to concerned if there are gaps or it's non perfect. One make clean, unmarried movement is all that it required.
Then you should recharge your brush if necessary and then come dorsum on the contrary stroke. This should fill any gaps caused by any bumps and stop with a nice make clean line.
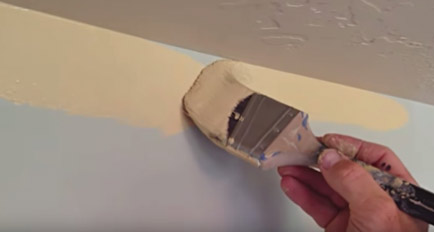
Cutting in requires two strokes in opposite directions
At this stage it is not worth worrying likewise much if it is non perfect. Don't waste your fourth dimension, as you lot ought to come dorsum for a second glaze anyhow and you will pick up whatsoever gaps then.
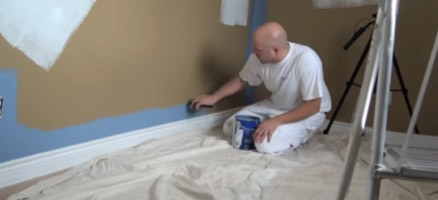
At this point is it worth using your small (four inch) roller to roll out the paint that y'all have cut in. This volition brand the join between the remainder of the painting more seamless and prevent whatsoever "edge effects" where the two join.
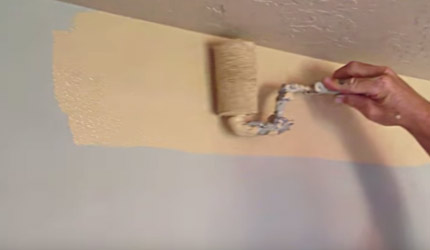
Use a small roller to ensure that your cutting in is seamless
You now need to piece of work your mode methodically effectually the room, working on almost 12-18 inches at a time.
Cut in to every border, including all ceilings, skirting's and architraves.
If y'all take a narrow gap between the ceiling and the door, you might as well paint this while you are there every bit it will be easier that trying to wield a large roller into this gap.
You will probably need to come dorsum for a second coat so don't rush and don't worry about gaps and imperfections. The second coat will pick these up.
As we have mentioned, if you tin can, it is a skillful idea to endeavour and paint the room while your cut in paint is not yet dry out as this will allow y'all to taper in the two paint effects more easily.
Don't worry if you can't because with the techniques we have shown you lot this will not exist a problem anyway.
At present all you demand to practise is clean your castor correctly so they tin can be used again and go painting the wall!

How To Get Crisp Clean Corners By Ceiling When Painting,
Source: https://www.diydoctor.org.uk/projects/cutting-in-before-painting.htm
Posted by: fultzmillong.blogspot.com
0 Response to "How To Get Crisp Clean Corners By Ceiling When Painting"
Post a Comment